
How to replace the paddle
BUTTON V1 (PS5)
BUTTON V2 (PS5)
Paddle (PS5)
BUTTON (PS4)
FUSIÓN X
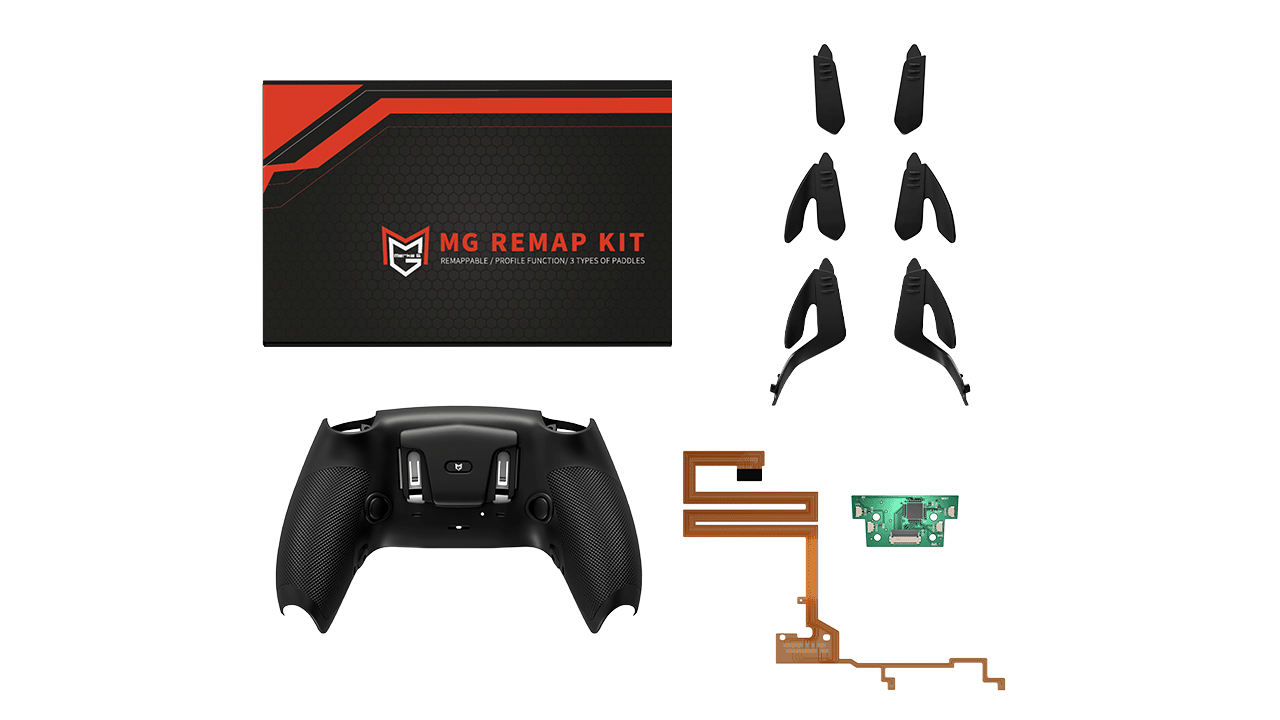
REMAP KIT
Reset

Press and hold L1/L2/R1/R2 simultaneously until the mute button flashes red once to enter remapping mode.
*The light may be weak, so please try it in a dark place.
Press the rear button you want to set, then press the button you want to assign and release it at the same time.
The assignment is successful when the mute button flashes red.
*If you want to assign no rear button, just press and release the rear button.
Press the up button on the D-pad or the L3 button to save and activate your assigned settings.
When the mute button flashes red once, the setting has been saved and applied.
In step 2, press the back button, press O, and release them at the same time.
After saving the settings in step 3, press the corresponding rear button and the circle will react.
If a problem occurs, such as the back buttons being judged as being pressed repeatedly, perform a remapping reset.
1. With the controller turned off, press and hold the ○, ✕, □, and △ buttons simultaneously for at least 5 seconds.
2. While still holding down the ○✕□△ buttons, turn the controller back on and the reset is complete when the mute button flashes red for about 3 seconds.
Please make sure the controller is powered on.
The rear buttons can be assigned to ↑/↓/ ←/ →/ △/○/□/X/L1/L2/L3/R1/R2/R3.
If you are unable to remap, please press and hold the PS (Home) button for 10 seconds to turn off the power, then press the PS (Home) button to turn the power back on. Please note that remapping will not be possible if the battery is low.

Press and hold L1+L2+R1+R2 or L1+R1+×+□ simultaneously until the mute button flashes red to enter remapping mode.
*The light may be weak, so please try it in a dark place.
When in remapping mode, you can select a profile (PF) by performing the following operations.
・D-pad Up: PF1 (LED flashes once)
・D-pad →: PF2 (LED flashes twice)
・Drawing pad: PF3 (LED flashes 3 times)
・D-pad Left: PF4 (LED flashes 4 times)
*1. What is the profile function?
This function remembers the assignments of the rear buttons. You can save up to four favorite settings.
Press the rear button you want to set, then press the button you want to assign and release it at the same time.
The assignment is successful when the mute button flashes red.
*If you want to assign no rear button, just press and release the rear button.
Press X to save and activate the assigned settings.
When the mute button flashes red, the setting has been saved and applied.
In step 3, press the back button, press O, and release them at the same time.
After saving the settings in step 4, press the corresponding rear button and the circle will react.
You can switch profiles without entering remapping mode by pressing L1+R1+×+□+profile selection key (cross key). *The mute lamp will flash.
・L1+R1+×+□+↑(PF1)
・L1+R1+×+□+→(PF2)
・L1+R1+×+□+↓(PF3)
・L1+R1+×+□+←(PF4)
If a problem occurs, such as the back buttons being judged as being pressed repeatedly, perform a remapping reset.
1. With the controller turned off, press and hold the ○, ✕, □, and △ buttons simultaneously for at least 5 seconds.
2. While still holding down the ○✕□△ buttons, turn the controller back on and the reset is complete when the mute button flashes red for about 3 seconds.
Please make sure the controller is powered on.
The rear buttons can be assigned to ↑/↓/ ←/ →/ △/○/□/X/L1/L2/L3/R1/R2/R3.
If you are unable to remap, please press and hold the PS (Home) button for 10 seconds to turn off the power, then press the PS (Home) button to turn the power back on. Please note that remapping will not be possible if the battery is low.

Press and hold the remapping button until the indicator turns red.
The light may be weak, so try it in a dark place.
While pressing the rear button you want to set, simultaneously press the button you want to assign until the indicator flashes quickly three times.
If it does not flash quickly, try the same procedure again.
To unassign the device, repeat the same process. The device will be unassigned when the indicator flashes three times slowly.
To save and activate your assigned settings, press and hold the remapping button until the indicator goes out.
When the light goes out, the save and apply process is complete.
In step 2, while pressing the rear button, press O at the same time until the indicator flashes three times quickly.
After saving the settings in step 3, press the corresponding rear button and the circle will react.
Please make sure the controller is powered on.
The rear buttons can be assigned to ↑/↓/ ←/ →/ △/○/□/X/L1/L2/L3/R1/R2/R3.
Each button assignment can only be made to one button. You cannot assign multiple buttons to one button.
The remapping function version 1 does not allow you to register L3/R3/touchpad.

Press and hold L1/L2/R1/R2 simultaneously until the indicators flash red once to enter remapping mode.
*The light may be weak, so please try it in a dark place.
Press the rear button you want to set, then press the button you want to assign and release it at the same time.
*If you want to assign no rear button, just press and release the rear button.
Press the touchpad button once to save and activate the assigned settings.
When the indicator flashes red once, the setting has been saved and applied.
In step 2, press the back button, press O, and release them at the same time.
After saving the settings in step 3, press the corresponding rear button and the circle will react.
If a problem occurs, such as the back buttons being judged as being pressed repeatedly, perform a remapping reset.
1. With the controller turned off, press and hold the ○, ✕, □, and △ buttons simultaneously for at least 5 seconds.
2. While still holding down the ○✕□△ buttons, turn the controller back on and the reset is complete when the indicator flashes red about 10 times.
Please make sure the controller is powered on.
The rear buttons can be assigned to ↑/↓/ ←/ →/ △/○/□/X/L1/L2/L3/R1/R2/R3.
If you are unable to remap, please press and hold the PS (Home) button for 10 seconds to turn off the power, then press the PS (Home) button to turn the power back on. Please note that remapping will not be possible if the battery is low.

Press and hold the profile button until the indicator starts flashing.
The light may be weak, so try it in a dark place.
Press and hold the rear button you want to set and the button you want to assign at the same time, and the indicator will flash rapidly.
Release the button and when the blinking slows down, the remapping is complete.
Press the Profile button once to save and activate your assigned settings.
When the indicator stops flashing and stays lit, the settings have been saved and applied.
In step 2, press the back button, press O, and release them at the same time.
After saving the settings in step 3, press the corresponding rear button and the circle will react.
The profile function allows you to save the remapping status assigned to the rear buttons.
Fusion X allows you to save up to four profiles, and the indicator color will change depending on the profile.
PF1: Blue
PF 2: Red
PF 3: Green
PF 4: Pink
Press the profile button once and when the profile LED changes color, the switch is complete.
To reset remaps, enter remap mode, press and hold L3 and R3 simultaneously for 3 seconds, the indicator will flash white 3 times, then all profiles will be reset to default.
Please make sure the controller is powered on.
The rear buttons can be assigned to ↑/↓/ ←/ →/ △/○/□/X/L1/L2/L3/R1/R2/R3.
Each button assignment can only be made to one button. You cannot assign multiple buttons to one button.
How to replace the paddle
PALETA 1
Press the part with the three lines and slide it down to remove it.
Slide it firmly until the protrusion at the tip is hidden.
*You will feel a "click" as it snaps into place.

PALETA 2
Press the part with the three lines and slide it down to remove it.
Slide it firmly until the protrusion at the tip is hidden.
*You will feel a "click" as it snaps into place.
PALETA 3
Pull the part that touches the bottom button and push in the part with the three lines and slide it down to remove it.
Slide it firmly until the protrusion at the tip is hidden.
*You will feel a "click" as it snaps into place.
The paddle can be removed by sliding it. Please be careful not to pull it too hard as this may cause damage.
Installation Instructions
Exterior replacement

*Please watch from 19:25 to 31:10.
Turn off the controller and disconnect it from the PS console or PC.
Also unplug the USB cable.
Use a pin or paperclip to press and hold the reset button located inside the small hole on the back of the controller for 5 to 10 seconds.
Use a USB cable to connect directly to your PS5/PS4 or PC.
Press the PS button in the center of the controller and if it is recognized correctly, the reset is complete.
Notes
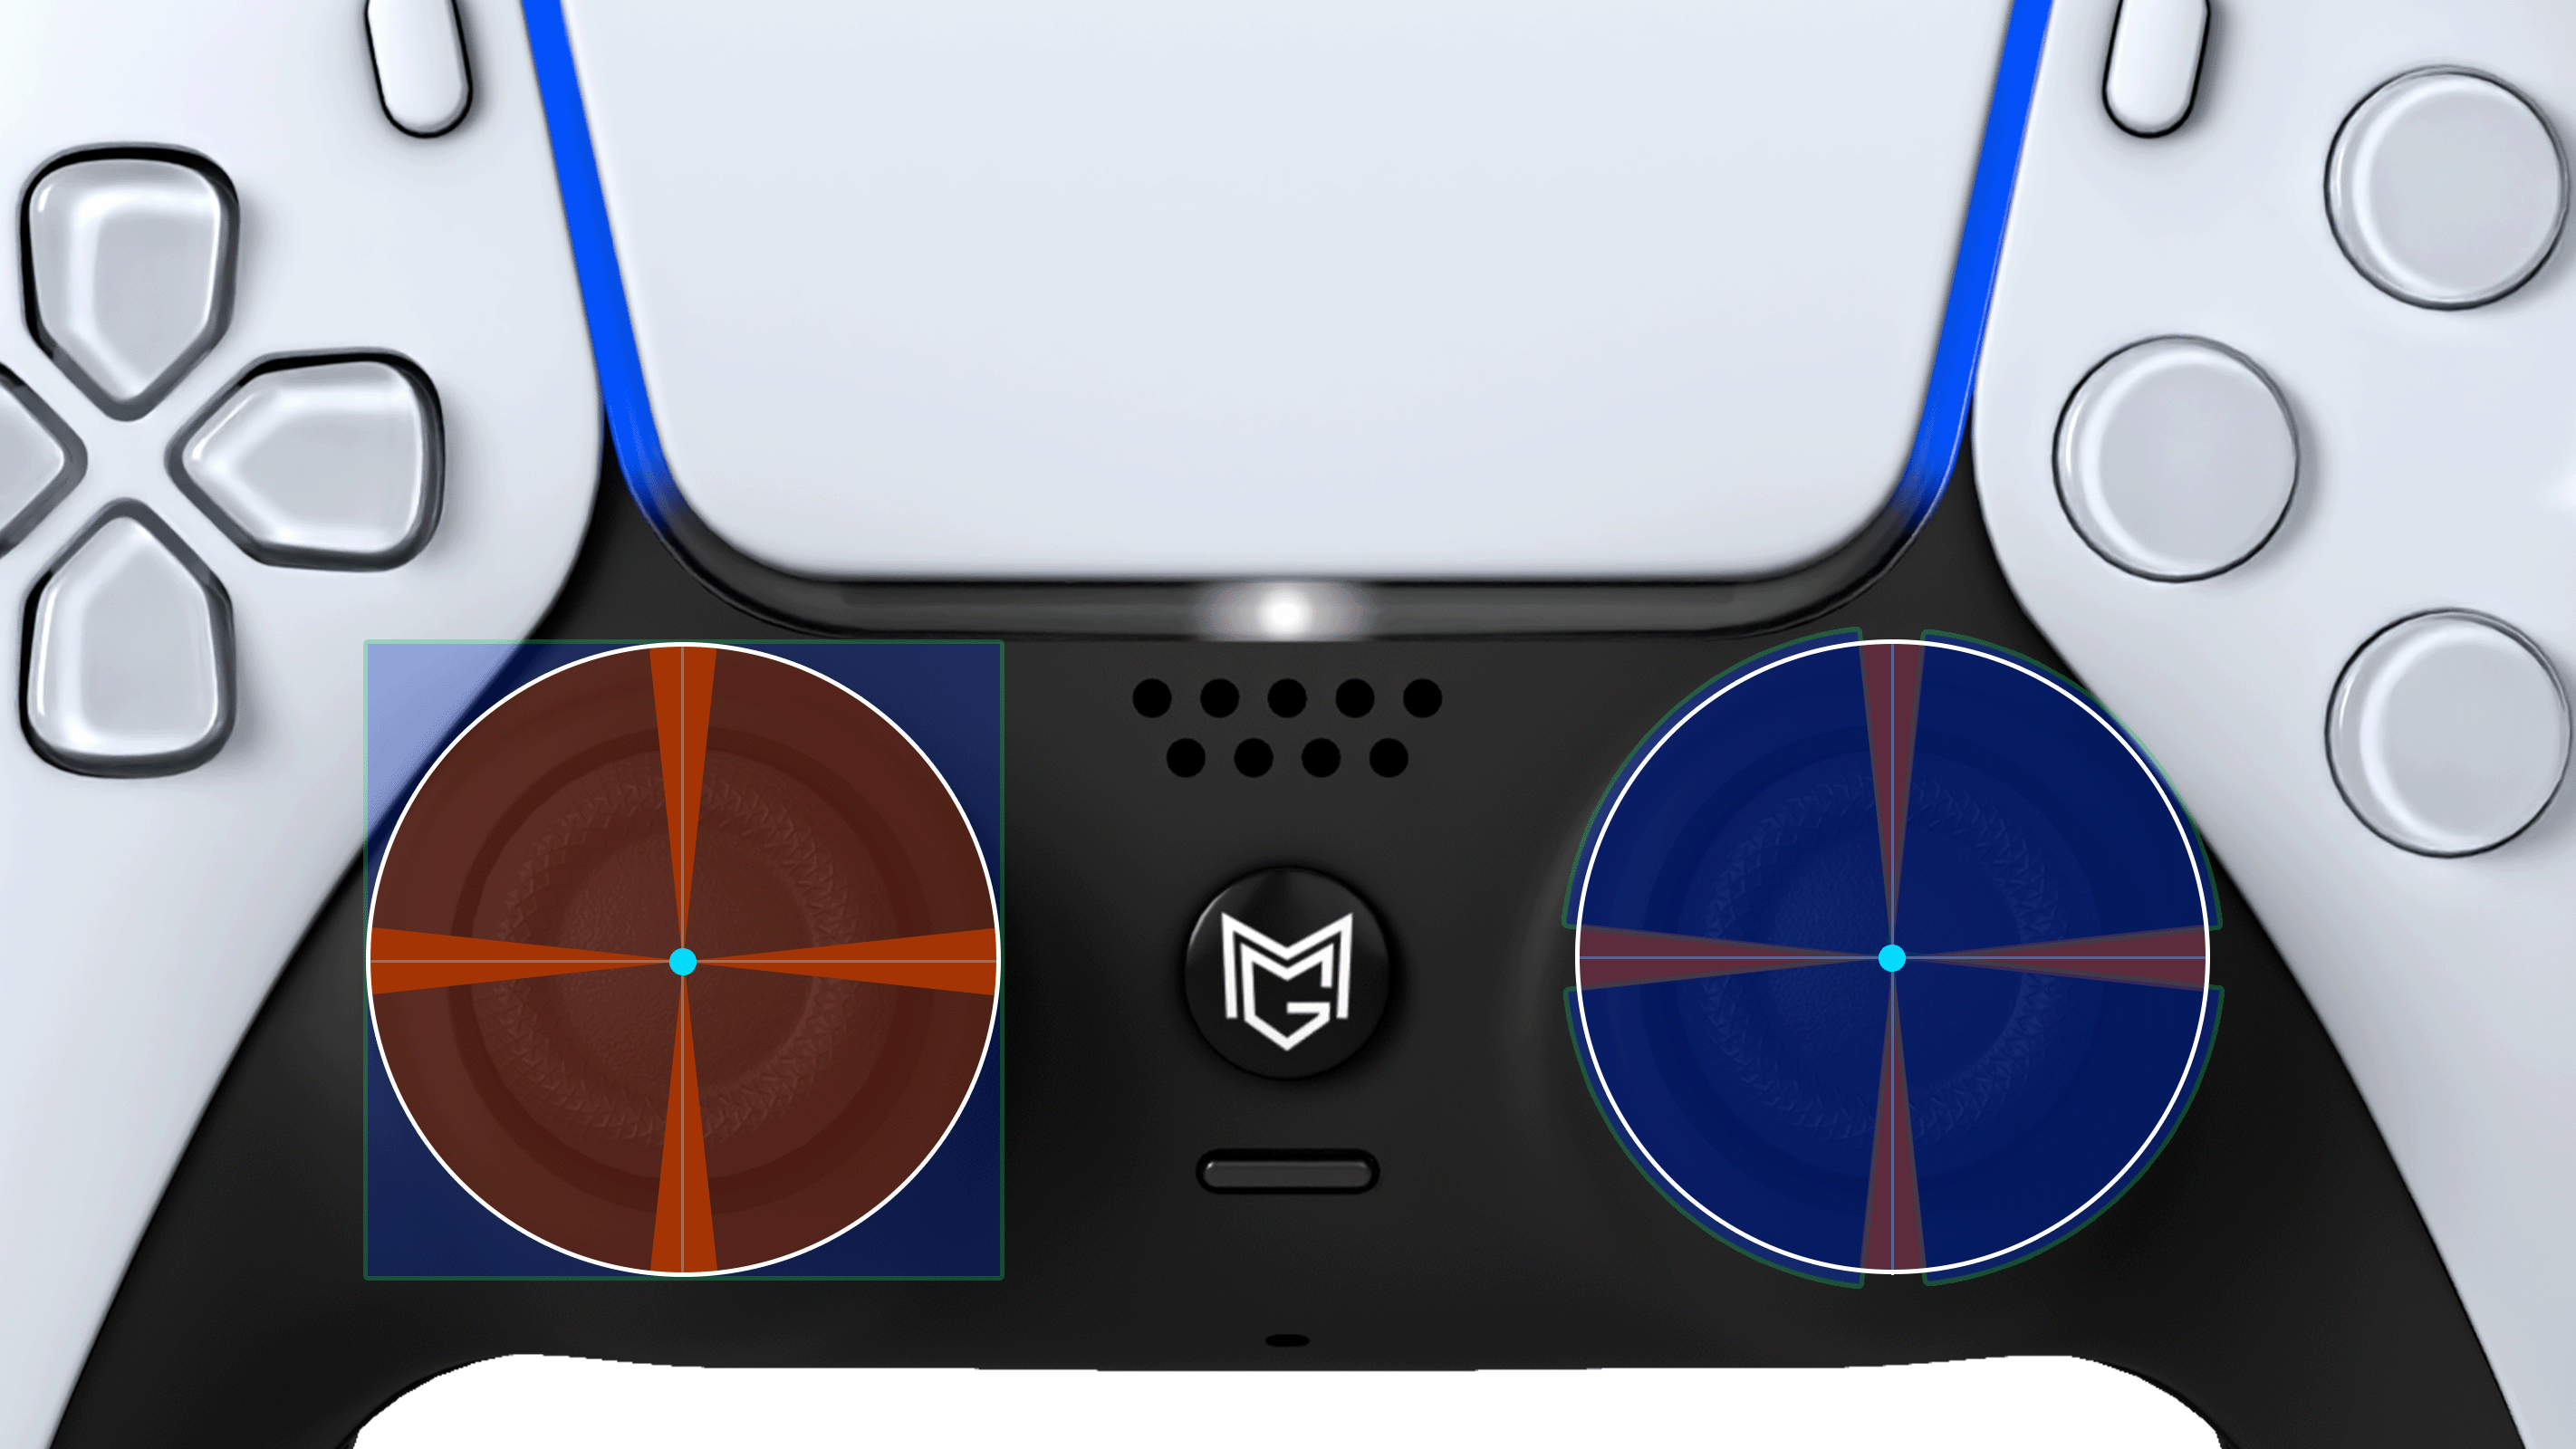
Center Adjustment
Range of motion adjustment
Outer periphery correction
Reset
Since the product has been corrected by our store before shipping, we do not recommend making any more corrections or adjustments than necessary.
Do not operate the sticks until the controller is connected to your PC or game console. *If you move the sticks before connecting, you may enter regulator setting mode. You cannot operate the sticks while in setting mode. If you do enter setting mode, please restart the controller.
We recommend using a controller tester for adjustments and corrections. (This can also be done on other sites.)
Adjustments and corrections can also be made on a PC, smartphone, or tablet.
*Accurate values may not be displayed if you are using a smartphone or tablet (Bluetooth).
*PC recommended *Wired connection recommended
If an error occurs during adjustment or correction, turn off the controller power and reconnect it after 2 to 3 seconds.
*If you are using a wired connection, unplug the cable and wait 2-3 seconds before reconnecting.
The instruction manual provides examples of corrections and adjustments made using a PC (wired connection).
If you are using Bluetooth, please make sure to register the controller to your PC, smartphone, or tablet beforehand.
You can restart the controller by pressing and holding the home button until the controller light goes out.
*For Bluetooth

Open the Controller Tester on your PC.
Just tilt the stick in any direction and connect it to your PC via a wired connection.
If the center is fixed on the tester screen and the stick does not respond when moved, the controller is in calibration mode. Point the stick in the desired direction and move it several times until it reaches the desired position.
*Repeat "tip → release → tilt → release" until the center point is in the center.


When you're done, press both sticks down to save your settings.
After that, disconnect the controller from the PC, then reconnect it and check that it works.

Open the Controller Tester on your PC.
While pressing the stick (e.g. left and right), tilt the stick in the direction you want to adjust, and then connect it to your PC via cable.
When you enter the adjustment mode, the center point moves in the direction you want to adjust.
* In this state, you cannot move freely.
To adjust the up/down position, move the stick left or right. Moving it to the right will increase the range of motion, and moving it to the left will decrease it.
To adjust left and right, move the stick up and down. Moving it down will widen the dead zone, and moving it up will narrow it.


When you're done, press both sticks down to save your settings.
After that, disconnect the controller from the PC, then reconnect it and check that it works.
Open the Controller Tester on your PC.
While pressing the stick (e.g. left and right), connect it to your PC via cable.
If the stick does not move even when you move it, it is in correction mode.
Rotate both sticks slowly clockwise three times.


When you're done, press both sticks to save your settings.
After that, disconnect the controller from your PC, then reconnect it and check that it works.
*The values may vary from one item to another. We adjust the value to be between 4 and 6%.


Open the Controller Tester on your PC.
While pressing the stick causing the error (e.g. L3), connect it to your PC via a wired connection.
If the joystick (e.g. L3) is unresponsive when you move it, it means the controller is in calibration mode. To enter calibration mode, press the joystick (e.g. L3) three times. Once complete, disconnect and reconnect the controller to your PC.
After reconnecting, move the stick and if it goes out of control as shown in the video below, the reset is complete.
*If the system does not go out of control, repeat steps 2-3.


While holding down the stick experiencing the error (e.g. L3), connect it to your PC via a wired connection.
If the stick does not respond when you move it, you are in calibration mode. Next, slowly move the stick clockwise 3 times, then press the stick (ex. L3) to save the settings.
First, disconnect the controller from your PC and then reconnect it.
After that, check to see if the stick works properly. If it does, the reset is complete.
Once the reset is complete, try the correction/adjustment mode.
Company
Address
2-3-7-302 Kasuga,Ibaraki,Osaka,Japan